Sunday, October 9, 2011

Carrot Cake

Carrot cake is my Dad's absolute favorite cake flavor, but he's kinda persnickety about it. The boxed ones are a no-go...and the ones that taste like spice cake, uh- uh. So, finding a recipe that he approved of was quite a task.

A friend of ours brought over her version of carrot cake one night, and it was a winner. So naturally, we had to have the recipe, and this has been one of our favorites for a long time now.

You'll need:
1 1/2c. sugar
1c. oil
3 eggs
2c. flour
1 1/2tsp. cinnamon
1 tsp. baking soda
1 tsp. vanilla
1/2tsp. salt
1/4tsp. nutmeg
3c. shredded carrots

Mix all the ingredients together except the carrots using a hand mixer. Once all these are incorporated, stir in the carrots by hand. Pour the batter into a greased and floured baking pan, or two 8-in round cake pans. Bake at 350* for 35-45 minutes or until a toothpick comes out clean. Remove from the oven and let it cool.
While the cake is sitting, go ahead and make the frosting. Obviously, this cake calls for a cream cheese frosting, and unfortunately for you all, I don't use a recipe. But, I can give you a basic idea.

I use 1 block of cream cheese, and throw in a little milk, a little vanilla, and I add powdered sugar until the consistency is slightly thick but still spreadable, and it tastes good.  Yeah....sorry 'bout that. That's how I cook most of the time...

All that's left now is the assembly. You could get fancy and really 'decorate' the cake, but I just poured the frosting over the cake still in the pan, and sprinkled it with cinnamon.

And there you have it! A full serving of vegetables too! ;)

Happy Cooking!
-G


Friday, October 7, 2011

Stuffed Shells with Meat Sauce

My aunt is out of town for a couple weeks, and when that happens, my uncle is a regular dinner guest at our home. I let him make a petition for tonight's meals, and he chose "italian." So, tonights meal was for him, and we had stuffed shells in a tomato meat sauce.

I found this recipe online from the Taste of Home website, and it turned out to be soo good. The family asked for seconds, so I take that as a good sign.


You'll need:
28 uncooked jumbo pasta shells
1lb. ground beef
1/2c. chopped onion
1 garlic clove, minced
2 cans (15oz. each) tomato sauce
1 can (280z.) Italian diced tomatoes, drained
1 1/2 tsp. dried oregano, divided
1/2tsp. dried basil
2 eggs, lightly beaten
3 c. (24 ounces) cottage cheese
2 packages (10 oz. each) frozen chopped spinach, thawed and squeezed dry
2 cups shredded mozzarella cheese
1/2c. grated parmesan cheese
1/2tsp. seasoned salt

In a skillet, cook ground meat, onions, and garlic until the meat is cooked through. Drain the meat, then add the tomatoes and tomato sauce, plus the basil and 1 tsp. of oregano. Let this come to a boil, then reduce the heat and simmer the sauce for 10-15 minutes.

While that goodness is happening, boil the jumbo shells for about 8 minutes to where they are softened, but not breaking apart.
In a separate bowl, the stuffing for the shells takes place. Mix together the eggs, cottage, mozzarella, and parmesan cheese,  seasoned salt, spinach, and remaining 1/2 tsp. of oregano.

Now it's time for assembly. Lightly grease a large baking dish, and spread a cup or so of the meat sauce mixture over the bottom of it.  Have your cooked shells and cheese mixture on hand, and have at it...
Stuff each shell with a little bit of the cheese mixture, and lay them on the baking pan in a single layer.

Top these babies with the rest of the meat sauce...

...and bake them covered at 350 degrees for 45 minutes or until the sauce is bubbling and the cheese looks nice and gooey.

Serve 'em up and eat them warm. These were really hearty and would make a great cold-night meal. But, seeing as we never get those here, I had to seize the moment and make them now ;)

Happy Cooking!
-G


Saturday, September 10, 2011

Chicken Mediterranean

As promised before, here's the recipe for the meal that I prepared to go with the Asiago bread. I've been making this recipe for a long time...it's just so simple to make, yet tastes like I put a lot of time into it. Plus, it has one of my favorite ingredients.....feta cheese. How can you go wrong with that?

OK, you'll need:
1/2 lb. skinned and boned chicken breast halves, cut into cubes
4 garlic cloves, minced
2 Tbs. olive oil
1 (14.5 oz.) can diced tomatoes, undrained
1/4c. kalamata olives, pitted and chopped
1/2tsp. dried parsley flakes
1/2 tsp. dried basil
1/2tsp. dried  oregano
1/3c. crumbled feta cheese
4 ounces pasta, cooked

 Combine the chicken, garlic, and olive oil in a ziplock bag, and let this marinade in the fridge for a few hours (I season the chicken with adobo, so I skip this step, but if you don't have adobo, do this).

Cook the chicken in a large skillet until all the chicken is cooked.
Remove the chicken from the pan, and add tomatoes and olives, along with all the spices to the skillet. Reduce heat and simmer for about 7 minutes, making sure to stir it occasionally so the tomatoes don't burn.

Return the chicken to the pan, add the feta cheese, and remove the skillet from the heat. Cover and let it stand for about 5 minutes.

Serve this over any hot pasta of your choice, and chow down!

Happy Cooking!
-G


Tuesday, August 23, 2011

Rosemary Asiago-Laced Bread

I love baking artisan-type breads.  They can add such a fancy flair to a meal, and the possibilities are really endless when coming up with good combinations to bake together.  The only downside is that breads can be kinda tricky to do.  The whole proofing process sometimes flops, then the whole recipes goes down the drain. But I love it when a loaf really comes out perfect!

I found this bread recipe in a Food and Wine magazine, and decided to give it a try. I had some Asiago cheese left from another recipe, so decided it was time to give it a try. Now, word of warning, that is a strong cheese...some people in my house were slightly nauseated while the bread was baking from the intensity of the smell, but they approved of the finished product ;)

Here's what you'll need:
1 Tbsp. active dry yeast
1 1/4c. warm water
2 tsp. sugar
4-4 1/2c. all-purpose flour
2 tsp. salt
2 tsp. chopped fresh rosemary
2 tsp. dried minced onions
1/8 tsp. cayenne pepper
2 Tbsp. olive oil
1/2c. shredded Asiago cheese
1/2c. shredded Parmesan cheese
1 egg beaten with 1 Tbsp. water
Sprinkle yeast over 1/4c. water. Stir in 1 tsp. of sugar. Let stand for 10 minutes until the mixture is foamy.
Stir together 3 1/2c. of flour, salt, rosemary, minced onions, cayenne pepper, and remaining teaspoon of sugar.
Pour yeast mixture into flour mixture. Add remaining 1 cup warm water and the olive oil. Stir to form a ball. Mix together the cheeses and add 3/4c to the mixture.
Turn onto a well-floured surface and knead until dough is elastic and smooth. Place the ball of dough in a greased bowl.

Cover and let rise, till it looks like this...

Punch down the dough, and roll into a loaf shape, making sure to tuck the ends under.
Cover and let rise till it's doubled in size. Once it does that, brush the loaf with the egg wash mixture, and top with remaining cheese mixture.

Bake at 400 degrees for 30 minutes or until the loaf sounds hollow when tapped. Remove from the pan and cool.

I served this with Mediterranean Chicken (recipe soon to follow), and it paired splendiferously!

Happy Cooking!
-G 


Friday, August 5, 2011

Rocky Road Candy

I noticed that I haven't posted on sweets since I first started this blog, so I decided to remedy that with this post.

This recipe is one that my family has been doing for ages...it's super simple and so delicious! I never tire of rocky road candy ;P

You'll Need:
1 (12 oz.) pkg. semi-sweet chocolate morsels
1 (14oz.) can sweetened condensed milk
2 T. butter
2c. dry roasted peanuts
1 (10 1/2 oz.) package mini marshmallows

In a saucepan over low heat, melt chocolate morsels with butter and condensed milk. Remove from heat. In a large bowl, combine peanuts and marshamallows; stir in chocolate mixture.
Spread in a wax-paper lined 13x9 pan and chill for 2 hours or until firm. Remove from pan, peel off wax paper, and cut into squares.


Happy Cooking!
-G

Thursday, August 4, 2011

Ribs n' Fixings

Growing up in the south, I have come to appreciate good Southern cooking. I'll admit, why people enjoy collard greens so much still eludes me, but for the most part, I'm a fan.  So when I was presented with a rack of ribs, and was told to make dinner, I decided to go for the gusto and make a nice Southern-style meal.

From my extensive culinary training by The Neeleys and the Food Network Channel, I knew that good ribs started with a good rub. So, I set off to make a rub that would make you slap yo' mama.

This one had a little bit of everything in it: chili powder, garlic powder, onion powder, black pepper, paprika, cumin, salt, brown sugar, and cayenne pepper (I had to control myself with that one....some members of my family don't appreciate as much 'kick' as I do )


I then proceeded to rub the rack of ribs with this mix until I had pretty much all of it covered. And my friends, don't be shy with this, rub a dub the meat like there's no tomorrow. It makes a difference ;)

Now comes the part where I deviated a little bit. Usually, you're supposed to grill these babies, but, seeing that it's like 100 degrees outside, I decided to do myself a favor and cook them another way. I placed the ribs on a large baking sheet, and cooked it in the oven at 250 degrees for 2-4 hours (depending on how big your rib rack is). I actually like this technique better..the ribs almost fall off the bone, and the rub really soaks into the meat. Not to mention, once it's in the oven, you can really forget about it and do other things.

 
I served these with some delicious sides, one of my favorites being the grilled corn. I'd never done that before, but I mixed some leftover rub with some butter, slathered the corn with it, and grilled it until it looked done. Ahh...the corn came so sweet and savory...too good.

All in all, this dinner came out pretty good. I wouldn't call it a total success, as I didn't actually slap my mama, but it came close nonetheless ;)

Happy Cooking!
-G

Friday, July 29, 2011

Homemade Applesauce

You know what's kinda funny? Before I cooked this applesauce recipe, I didn't really care for applesauce. The fact that I wanted to cook it was a surprise in itself, but, I was making a rosemary roasted chicken, and for some reason the idea of pairing it with something sweet appealed to me, so I gave it a try.

Let me just say, I've been converted to applesauce...homemade applesauce that is! It was so good, and the house smelled delicious with that cooking over the stove and the chicken in the oven.

Here's what you'll need:
8 cooking apples ( I used Red Delicious)
1c. brown sugar
1/2 tsp. ground cinnamon
1/4 tsp. ground nutmeg
2c. water

Peel, core, and cut apples into large chunks. Place in a pot with 2 cups of water.
Bring to a boil, then reduce to a simmer for 5-10 minutes or until apples are semi-soft. Once that happens, add brown sugar, cinnamon, and nutmeg. Stir well and continue to simmer until sugar granules are dissolved and apples are soft.

Now's the time for it to really take 'applesauce' shape. If you want, you can mash it by hand, but I threw the apples into a food processer and pulsed them until they got to the thickness that I wanted. I like mine a little chunky, but you can puree them to your little hearts desire.

Return the applesauce to the pot, and keep warm on the stove until ready to serve...or you can refrigerate them to eat as a cold side. Either way, they will be delish!
Happy Cooking!
-G


Wednesday, July 27, 2011

Dining through Europe

So I was trying to figure out what to do for dinner one day, and I felt inspired to try something different. Usually, we have a meal that consists of a main dish, a side, some veggies....same ole, same ole. The idea to do a "European style" meal seemed super duper not only because it's easy, but, I was feeling very "ooh la la" that day.

OK, so what I call European style is pretty much a table full of appetizers and fancy Hors d'oeuvres that go well with wine. Obviously, fruit and nuts was a must. I also found some prosciutto and aged Asiago cheese, AKA "smelly cheese" that paired really well with wheat crackers. And yes, that is guacamole and chips on the table too...not very European, but hors d'oeuvre-ish nonetheless.


I also found these cute little pickles at the store that I thought would go great with some garlic-stuffed olives. And of course, the standard cheese ball and bruschetta is a must. 


Yes, that is also a Margarita. You didn't think you could have chips and dip without a little somethin' somethin' to wash it down!
So there you have it, a dinner in Europe without the passport!

Happy Cooking!
-G

Tuesday, July 26, 2011

Pumpkin Chip Muffins

Pumpkin and chocolate are two things that I would have never put together in a recipe. They just seem like they would really clash in flavor. But, recently I found this recipe for a pumpkin chocolate loaf (which I converted into muffins), and the pictures looked so good that I decided to give it a try.

I baked these for a fundraiser bake sale, and sure enough, the entire tray of over 30 muffins was the first item to go! I think what makes them so good is that not only do they have a spice-cake flavor, but on top of that, they add chocolate in the batter and chocolate chips. Peeps, doesn't get any better than that!

Here's what you'll need:
3-1/2c. sugar
1-1/4c. vegetable oil
3 eggs
1 can (29-oz.) solid-packed pumpkin
3 squares (1-oz. each) unsweetened chocolate, melted and cooled
1-1/2tsp. vanilla extract
3-3/4c. all-purpouse flour
1-1/2tsp. salt
1-1/2tsp. baking powder
1-1/4tsp. baking soda
1-1/4tsp. ground cinnamon
1 to 1-1/4tsp. ground cloves
1/2tsp. ground nutmeg
2c. semisweet chocolate chips

In a large bowl, combine sugar and oil. Add eggs and mix well. Stir in the pumpkin, chocolate and vanilla. Add the dry ingredients into the pumpkin mixture, and stir until blended. Stir in chips.

Scoop into well-greased muffin tins and bake at 350 degrees for 55-65 minutes or until toothpick comes out clean. Cool for ten minutes, then remove from pan and cool on a wire rack.

Happy Cooking!
-G

Monday, June 13, 2011

There's Somethin' Fishy Goin' on........

I don't like fish. I never have. Growing up in the panhandle, that's pretty much a mortal sin. Everybody needs to like fish...it's just the way it is.

One thing that I do like is burgers. I'll take a sloppy, greasy cheeseburger any day. But, in efforts to be more health conscious, I decided to compromise and find a healthier alternative to the regular American cheeseburger. I found recipes for black bean burgers, but all the comments I read about them said they tasted like crumbly cardboard. So, I chucked that idea. During my search, I came across a recipe for salmon burgers by Paula Deen (of course). At first, I wasn't thrilled with the idea, but I decided to give it a try anyway, and OMG, I'm so glad I did. They were AMAZING! And very simple to make, not to mention, very healthy!

Here's what you need to make them:

1/2c. red bell pepper, diced
1/2c. yellow bell pepper, diced
3/4c. panko
2 cloves garlic, minced
2lbs. salmon fillets, skinned and finely chopped
1 lg. egg, slightly beaten
1 Tbs. soy sauce
1 tsp. lemon juice
1/2 tsp. salt
In a medium bowl, combine peppers, panko, garlic, and salmon. Add egg, soy sauce, lemon juice, and salt. Use hands and combine all the ingredients. Form the mixture into 8 patties.

Lightly coat a grill pan or skillet with cooking spray.  Heat over medium-high heat until hot. Grill patties, 5 minutes per side, or until desired degree of doneness (I also threw the buns on the grill at the same time to get toasty.)
While the fishy patties were grilling, I made a seasoned mayonnaise, using 1c. mayo, 2 cloves minced garlic, 1 tsp. soy sauce, and 1/2tsp. sesame oil.

Spread the sesame mayonnaise over toasted buns. Top each with a lettuce leaf, tomato, slice of red onion, and a salmon patty (which I topped with melted provolone cheese.)

Yeah.....it was pretty awesome, if I do say so myself....

Happy Cooking!
-G

Thursday, June 9, 2011

Mini Blueberry Cobblers

It's that time of year again......


In honor of the initiation of summer, I decided to welcome back the blueberry! Oh how I love this little fruit...

Last Christmas, I was given a set of ramekins, and I've been scratching my head on what I can use them for. Well, after scouring the internet for recipes, the idea came to me....DUH! Why don't I make personalized cobblers? They were so simple to make, delicious, and I love how everyone had their own little serving!

For starters, I used 6oz. ramekins, so I used about 2/3c. of fresh berries. I dusted them with some sugar, and set them in the fridge to let them soak and make their own syrup.


Meanwhile, I made the crumb topping. I half invented the recipe, but really, it's very basic. I used 1/4c. flour, 1/2c. dry oats, 1/4c. brown sugar, 1tsp. cinammon, and 1/2 stick of butter. I cut the cold butter in until I had a nice crumbly mixture.

Top off your dishes with the topping........

And bake in a 375F oven for about 20 minutes of until you see that the tops are golden brown, and somewhat crispy.

After removing them, you might want to let them cool a little bit, but personally, I think the best way to eat these is piping hot with a nice scoop of icey cream on top!

Oh, how I love summer and all that it brings!

Happy Cooking!
-G

Monday, May 30, 2011

Girl......That's a French name!


 Alright, I already know what you're thinking. That this croissant recipe is going to have a million steps and ingredients and that in the end, it might "pop" and you'll end up with a flat piece of bread. To be honest with you, that's what I thought about croissants the first time I saw a recipe for them. Plus, they used so much butter and a small batch of them would turn out to be pretty pricey, not to mention not artery-healthy.

Well, contraire monfreir.........

As I was flipping through an old issue of Food and Wine Magazine, I came accross this recipe that had only four ingredients, and none of them were butter! So, I figured I would give it a try, and they turned out delicious!

Start out by combining 3/4c of hot water with 1 envelope of active dry yeast. Wait for it to do it's magic, then sir that in with 2 tablespoons of sugar and 3-3 1/2c of any all-purpouse baking mix (I used Bisquick).

Turn that dough onto a lightly floured surface and knead until dough is soft and elastic.

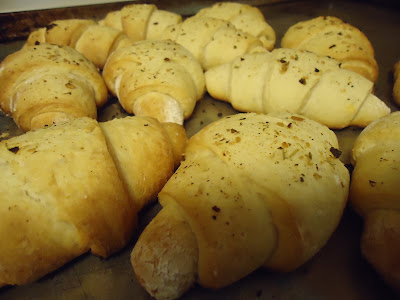
Roll the dough out into a 12-inch circle; cut the circle into 12 wedges.  Roll up wedges, starting at the wide end, to form a crecent shape. Place point side down into a lightly greased baking sheet.

I decided to add some pizzaz, so I lightly brushed them with butter and sprinkled them with an Italian seasoning mix. You didn't think I could make a croissant without using any butter, did you?

Cover and let rise in a draft-free place for about an hour or until they double in size. Bake in a 425F oven for 10-12 minutes or until the tops are golden brown.

Enjoy!

Happy Cooking!
          -G


Friday, May 27, 2011

Winner, Winner... Green Bean Dinner

OK, so my family and I really enjoy occasionally eating at this local Chinese buffet. I'm not sure how legit it is, seeing that they also serve beef enchiladas on the menu, but they make the most bomb shizzle green beans I have ever tasted. So, Dad decided to try to replicate their recipe, and even though they don't taste the same, they are still UH-MAZING!

When I make them, I take the liberty of tweaking with the ingredients, like I did for this post, and I've come to realize that when you cover a whole bunch of beans in butter and garlic, anything else added can only make it better! Almonds was a new addition for this recipe, but I bet bacon bits would also be really good.

I start this off by sauteeing lots of mashed garlic in some butter and olive oil, and I add a pinch of ground ginger just so I can call it "asian." When using almonds, I also throw those in there so they can get toasty!

In the meantime, I start cooking the beans. I always buy them fresh, and make sure to cut the dry ends off, and also in half so we don't have humongonous pieces.  Place them to boil in a medium sized pot. Once the water begins to boil, place a timer for 4 minutes. I like my beans more crunchy, but if you like them softer, obviously, boil them longer.


Once you get them to the desired tenderness,  blanch the beans in some cold water to keep them from cooking any more.

Drain the beans, and dump (don't you like that technical term?) them into the garlic and butter mixture. Give them a quick toss to incorporate everything, and, TADA, you have amazingeness in a pan!

I served these babies with some baked chicken, a creamy corn pudding, and a green salad and it truly was a winner, winner, grean bean dinner!

Happy Cooking!
-G